Web Integration Testing in CUBA Applications
In this guide you will learn how automated testing in a CUBA application works. In particular, this guide deals with the integration testing of the UI within the web layer.
What Will be Built
This guide enhances the CUBA Petclinic example to show how existing features can be tested in an automated fashion via web integration testing:
-
Owner Browse → Edit Interaction
-
Sending out Disease Warning Mailing
Requirements
Your development environment requires to contain the following:
-
CUBA Studio as standalone IDE or as an IntelliJ IDEA plugin
Download and unzip the source repository for this guide, or clone it using git:
Overview
In this third guide about testing you will learn how to test logic in the user interface. This is similar to the variant of middleware integration testing (see CUBA guide: middleware integration testing), where a close-to-production test environment is created for the test to run.
The difference in this case is that the provided environment starts only a part of a CUBA application that is inside the Client tier of the architecture diagram.

In particular, the Web client block is the part that is tested in a web integration test.
The Middleware block, on the other side, is not a part of the test environment. Instead Stub implementations are provided for all functionality in the block. This includes the CUBA standard APIs like DataManager and custom Services that contain business logic.
Web Integration Test Environment
In this environment the production application is started partially, just like in the middleware integration test. All the CUBA Platform based UI APIs work the same way as in the production code of the application. In the Web client block we have a big part of declarative definitions of the UI implemented via XML screen descriptors. These definitions are also covered and executed within the test environment.
Coverage Example
To understand the question of coverage let’s take a look at one example within the Petclinic application and identify which parts are included, which ones are mocked, and which ones are not covered by the test environment at all.
For this example let’s take a look at the List of Owners from the Petclinic. It consists of the XML descriptor part and the UI controller. In the following listing generally everything is covered and executed just as in the production environment. Therefore, it is not mentioning everything that is covered, but only the most important parts as well as the parts where the coverage ends.
<window>
    <data readOnly="true">
        <collection id="petsDc"
                    class="com.haulmont.sample.petclinic.entity.pet.Pet"
                    view="pet-with-owner-and-type-and-visits">
            <loader id="petsDl">
                <query>
                    <![CDATA[select e from petclinic_Pet e]]> (1)
                </query>
            </loader>
        </collection>
    </data>
    <layout expand="petsTable"
            spacing="true">
        <groupTable id="petsTable"
                    dataContainer="petsDc"
                    width="100%">
            <actions>
                <action id="calculateDiscount"
                    trackSelection="true"
                    caption="msg://calculateDiscount"
                    icon="MONEY"
                  />
                  <action id="createDiseaseWarningMailing"
                    caption="msg://createDiseaseWarningMailing"
                    icon="font-icon:BULLHORN"
                  />
            </actions>
            <buttonsPanel id="buttonsPanel"
                          alwaysVisible="true">
                <button id="calculateDiscountBtn"
                        action="petsTable.calculateDiscount"
                        /> (2)
                <button id="createDiseaseWarningMailingBtn"
                        action="petsTable.createDiseaseWarningMailing"/>
            </buttonsPanel>
        </groupTable>
    </layout>
</window>| 1 | the data loading mechanism is available, but the data has to be returned in the test manually via mocking |
| 2 | all buttons and actions are covered and can be executed in the test |
| The test environment behaves almost like the production environment. The XML Screen descriptor is loaded and the complete lifecycle of the Screen is executed. |
The main difference for the UI descriptor is the data loader section. Instead of performing the query against the database, the environment of the web integration test requires configuring the entity instances that should be returned.
Next to the UI Screen descriptor, the programmatic sibling is the UI controller. Let’s take a look at the coverage for the corresponding PetBrowse UI controller:
public class PetBrowse extends StandardLookup<Pet> {
    @Inject
    private Screens screens; (1)
    @Inject
    private Notifications notifications;
    @Inject
    private GroupTable<Pet> petsTable; (2)

    @Subscribe("petsTable.calculateDiscount") (3)
    public void calculateDiscount(
            Action.ActionPerformedEvent actionPerformedEvent
    ) {
        Pet pet = petsTable.getSingleSelected();

        String discountMessage = String.format(
                "Discount for %s: %s",
                pet.getName(),
                pet.calculateDiscount() (4)
        );

        notifications.create(Notifications.NotificationType.TRAY)
            .withCaption(discountMessage)
            .show();
    }

    @Subscribe("petsTable.createDiseaseWarningMailing")
    public void createDiseaseWarningMailing(
            Action.ActionPerformedEvent actionPerformedEvent
    ) {
        screens
            .create(
                CreateDiseaseWarningMailing.class,
                OpenMode.DIALOG
            )
            .show(); (5)
    }
}| 1 | CUBA UI APIs are covered and work as in production environment |
| 2 | UI Components injections that are defined in the XML Screen Descriptor are covered |
| 3 | Action Subscriptions that interact with the XML Screen Descriptor are covered and performed in case a button is clicked in the test |
| 4 | Business logic in the global module (e.g. pet.calculateDiscount()) is part of the test environment as well |
| 5 | The Screens API is executed correctly and the CreateDiseaseWarningMailing screen is opened |
In the UI Controller it once again behaves like in the production environment. All injections (UI components and CUBA APIs) work as expected. All business logic in the web and global modules is performed just as in the production environment.
Coverage of the Web integration test
Based on the example above, you can see the coverage of the web integration test environment in this overview diagram:

The solid arrows represent the connections that are part of the coverage, whereas the dashed arrows perform the not covered ones and have to be mocked / emulated by the test case.
As explained in the example, all Screen Controller code as well as the XML Screen descriptor definitions are covered. Additionally, all business logic located in the web and the global module is covered and executed.
On the upper border of the diagram the code executed in the browser is not part of the environment. This JavaScript code is part of Vaadin and is not covered.
| The web integration test environment does not interact with the application via a real web browser. To cover this area in a test case, a functional end-to-end test through tools like Masquerade has to be performed. |
The borders at the bottom of the layered diagram for the web integration test environment are the Middleware Services. The service interfaces themselves act as the point where the test case has to provide a stub implementation that returns the expected values.
The same is true for the declarative data loading in the XML Screen descriptor. Internally the declarative data interaction as well as the DataManager API uses the DataService Service to provide the data. This means that inside the test case, this DataService interface has to be replaced with a Stub implementation that provides the data to be used by the UI components. The detailed information about the DataService API can be found in the CUBA API Reference: DataService
Benefits & Limitations
Using web integration tests allows developers to automatically verify if the majority of the UI screen definitions and their business logic are correct. For the UI parts relying primarily on unit test would require to use a lot of mocking of the CUBA UI APIs as well as letting go the verification of the declarative part.
In the beginning we’ve learnt that web integration tests provide a close-to-production environment for the tests. This means that for a lot of UI logic verification it is not necessary to run an end-to-end black box test case through the browser via Selenium e.g.
Automated Testing through the web browser is inherently more complex to do. The asynchronicity of the browser interaction, the much more complicated test data setup, the speed of the execution are the examples of that.
Web integration tests do not have those problems. Instead, running the tests is orders of magnitude faster compared to running a selenium based test. A regular web integration test takes a sub second to run, whereas a Selenium based test easily can take half a minute to perform the same operation. Also, a lot of false positive tests runs that oftentimes occur in a selenium based test suite are not a problem of a web integration test. It happens because of the asynchronous nature of the browser which is not used in this case.
On the other hand, there are limitations on what a web integration test can do and verify. By the fact that we have to stub out data operations, it is impossible to find many scenarios that occur during that process. Here are some examples which can’t be caught during web integration tests:
-
a unique violation on the order ID field through the save in the Order editor
-
the customer name should be displayed in the orders table, but it is not part of the view
-
the JPQL query in the orders data loader is a valid statement
For all those examples (and more) it is not possible to verify the behavior with an integration test.
The same is true for the correct interaction with custom Services that are used in the UI. As those Services are stubbed out, so there is a potential to miss some scenarios in the mocking, which results in that the production application differs from the web integration test behavior.
These are limitations with a web integration test. To overcome them, you need a black-box end-to-end test case. CUBA has a dedicated library called Masquerade that makes creating those test cases easier. It is based on Selenium and therefore performs real browser based tests that interact with the application from the UI to the database.
Petclinic Web Integration Tests
After looking through the theoretical ways on what a web integration test is and where its functionality boundaries are, let’s shift gears here a little bit and take a look at how a web integration test looks. We will do that based on the Petclinic example.
First Web Integration Test
In order to run a web integration test you have to install and register as a JUnit extension an instance of TestUiEnvironment. The TestUiEnvironment is similar to the Test Container in the middleware integration tests. It acts as the running environment to interact with the application.
class PetEditTest {

    @RegisterExtension
    TestUiEnvironment environment =
            new TestUiEnvironment(PetclinicWebTestContainer.Common.INSTANCE)
                    .withScreenPackages(
                            "com.haulmont.cuba.web.app.main",
                            "com.haulmont.sample.petclinic.web"
                    )
                    .withUserLogin("admin");  (1)

    private TestEntityFactory<Pet> petsFactory;

    @BeforeEach
    void setUp() {
        Screens screens = environment.getScreens(); (2)

        petsFactory = environment
            .getContainer()
            .getEntityFactory(Pet.class, TestEntityState.NEW); (3)
    }

    // ...
}| 1 | The TestUiEnvironment is instantiated and directly configured |
| 2 | It is possible to retrieve CUBA APIs like Screens through the environment |
| 3 | The EntityFactory allows creating entity objects specifically for tests |
With the Entity Factory, it is possible to create Entities for the specific needs of automated tests (like the definition of the desired state). Besides, the majority of the CUBA APIs can be retrieved either directly from the environment or from the environment.getContainer() web test container.
With that setup part in place, let’s have a look at the first web integration test case. The test verifies that the PetEdit editor can be opened correctly and the identificationNumber property is bound to corresponding UI component.
class PetEditTest {
    // ...
    private Screens screens;
    private TestEntityFactory<Pet> petsFactory;

    @BeforeEach
    void openMainScreen() {
        screens = environment.getScreens();
        screens.create(MainScreen.class, OpenMode.ROOT).show(); (4)
    }

    @Test
    void identificationNumberIsCorrectlyBoundInTheInputField() {

        Pet pet = petsFactory.create(
                Collections.singletonMap("identificationNumber", "019")
        ); (1)

        PetEdit petEdit = showPetEditorFor(pet);

        TextInputField inputField = identificationNumberField(petEdit);

        assertThat(inputField.getValue()) (4)
            .isEqualTo("019");
    }

    private PetEdit showPetEditorFor(Pet pet) {
        PetEdit petEdit = screens.create(PetEdit.class); (2)
        petEdit.setEntityToEdit(pet);
        petEdit.show();
        return petEdit;
    }

    private TextInputField identificationNumberField(PetEdit petEdit) {
        return (TextInputField) petEdit
            .getWindow()
            .getComponent("identificationNumberField"); (3)
    }
}| 1 | a new Pet Entity is created via its test data factory |
| 2 | the CUBA UI APIs are used to open screens |
| 3 | getComponent allows to retrieve references of Components of the opened screen |
| 4 | CUBA’s Component APIs can be used to perform assertions |
This first test shows an example on how to programmatically open screens and interact with the components of the screen. In this example, we verify that the data binding in the form component is behaving correctly.
We neither check any controller logic nor check explicitly if CUBA’s internal data binding works as expected. Instead, we are verifying that the Screen descriptor contains a field named identificationNumberField. This field should be wired to the petDc data container and also to the identificationNumber entity attribute.
In particular, it is this part of the XML screen descriptor that is verified for correct usage:
<form id="fieldGroup" dataContainer="petDc">
    <column width="250px">
        <textField
            property="name"
            id="nameField"/>
        <textField
            property="identificationNumber"
            id="identificationNumberField" /> (1)
        <dateField
            property="birthDate"
            id="birthDateField" />
    </column>
</form>| 1 | the declaration of the identificationNumberField with the correct property binding and type is the relevant part for the test |
There are a couple of other areas of the overall code that are also verified implicitly:
-
the
PetEditjava controller has the correct annotation(s) to act as an Editor for thePetentity -
the XML definition of the Screen Descriptor
pet-edit.xmlis well-formed -
the screen could be opened without any errors (e.g. lifecycle events are performed correctly)
-
the entity was correctly bound to the
petDcdata container
As the web integration test environment is a kind of a grey-box test, it is possible to use the same APIs that are used in the production code. This simplifies test case implementation a lot, because all the knowledge of the CUBA APIs can directly be used in the integration test.
Interacting with UI components is also the same as in production code. The only difference is the retrieval of the component instances, as no dependency injection mechanism is available.
In this example, the data binding is manually handled by passing in the instance through petEdit.setEntityToEdit(pet). In the next example, we will take a look at the situation where the screen tries to automatically load data from the DataService.
Owner Browse
The second example is a web integration test that deals with the interaction between the Owner Browser and the Owner Editor. In this case the data loading happens automatically as the Controller is annotated with @LoadDataBeforeShow:
@LoadDataBeforeShow
public class OwnerBrowse extends StandardLookup<Owner> {
}
The controller embodies no further UI/business logic. The OwnerBrowseTest web integration test consists of two test cases:
The first test case verifies that the loaded data will be displayed correctly in the Table. The second test case goes a step further and checks the interaction between two screens: OwnerBrowse and OwnerEdit. Once an Owner is selected in the Table and the edit action is performed, the Owner Editor should be visible and the data of the selected Owner should be displayed.
Test: Declarative Data Loading
Let’s look at the first test case: when_ownerListIsDisplayed_then_ownersAreShownInTheTable.
To provide data to the data container, the result of the Data Service has to be mocked. For the web integration test environment a special DataService implementation is available: DataServiceProxy. This class mimics parts of the behavior of the regular DataService implementation. See the information from the CUBA Documentation:
| DataServiceProxy - default stub for DataManager. It contains an implementation for commit() method which mimics the behavior of the real data store: makes new entities detached, increments versions, etc. The loading methods return null and empty collections. |
In this case we would like the DataServiceProxy to return a pre-defined set of data when loadList is called. Also we would like to utilize the other parts of the DataServiceProxy implementation. This means, we have to only partially provide a different implementation of the class. Mockito allows us to achieve this partial mocking with a Spy. A spy is similar to a mock object, but the difference is that it calls the real methods except for the ones that are mocked out.
Let’s look at the complete test case first and then go though the details of the implementation:
class OwnerBrowseTest {


    //...

    @BeforeEach
    public void setUp() {
        mockDataService();
        data = new PetclinicData(environment.getContainer());
    }

    private void mockDataService() {
        dataService = Mockito.spy(
                new DataServiceProxy(environment.getContainer())
        );
        TestServiceProxy.mock(DataService.class, dataService);
    }

    @Test
    void when_ownerListIsDisplayed_thenOwnersAreShownInTheTable() {

        when(ownerListIsLoaded())
                .thenReturn(ashAndMisty);

        OwnerBrowse ownerBrowse = openScreen(OwnerBrowse.class);

        Table<Owner> ownersTable = ownersTable(ownerBrowse);

        assertThat(ownersTable.getItems().getItems())
                .hasSize(2);
    }

    private List<Owner> ownerListIsLoaded() {
        LoadContext<Owner> loadOwnerList = Mockito.argThat(loadContext ->
                loadContext.getEntityMetaClass().equals("petclinic_Owner")
        );
        return dataService.loadList(loadOwnerList);
    }

    // ...
}
In the setup part Mockito.spy(…) creates a new Spy Instance of the DataServiceProxy, where we can re-configure the behavior of the loadList method.
After creation of the Spy, we have to register the service instance as the DataService API implementation for the test in the test case. This happens through the static mock method of the TestServiceProxy.
The remaining part of the manual data configuration is the definition of the mock call and the expected result. For that we use the Mockito API: when(…).thenReturn(…). In this case, we need to be a little more precise, because we don’t want to mock all calls to DataService.loadList(…) but instead only the one where the load of the Owner entity happens.
The helper method ownerListIsLoaded defines this situation. Mockito.argThat is the API that lets the test define a Predicate lambda expression that determines if the method call parameters (loadList in this case) are matching against the call that we want to mock. Basically it acts as a filter, to pinpoint the call that we are searching for.
The Lambda gets passed in the original parameter of the method: LoadContext. loadContext.getEntityMetaClass().equals("petclinic_Owner") is our filter criteria to verify that the entity class is the Owner entity.
The usage of the method:
when(ownerListIsLoaded())
                .thenReturn(ashAndMisty);
defines the combination of the mock with the return values. In case the owner list is loaded, Ash and Misty should be returned.
With this information we can take a look at the actual test case once again:
class OwnerBrowseTest {
    // ...
    @Test
    void when_ownerListIsDisplayed_then_ownersAreShownInTheTable() {

        when(ownerListIsLoaded())
                .thenReturn(ashAndMisty); (1)

        OwnerBrowse ownerBrowse = openScreen(OwnerBrowse.class);

        Table<Owner> ownersTable = ownersTable(ownerBrowse); (2)

        assertThat(ownersTable.getItems().getItems())
                .hasSize(2); (3)
    }

    private Table<Owner> ownersTable(OwnerBrowse ownerBrowse) {
        return (Table<Owner>) ownerBrowse
            .getWindow()
            .getComponent("ownersTable");
    }

    private <T extends Screen> T openScreen(Class<T> screenClass) {
        T screen = screens.create(screenClass);
        screen.show();
        return screen;
    }
    // ...
}| 1 | The manual data loading is configured |
| 2 | The screen is opened and the table component is retrieved from the screen |
| 3 | An assertion is made on the items of the owners table size |
There are once again a couple of related points that are also implicitly verified:
-
the
OwnerBrowsejava controller has the correct Annotation to automatically load the data when the screen is opened -
the XML definition of the Screen Descriptor
owner-browse.xmlis well-formed -
the screen could be opened without any errors (e.g. lifecycle events are performed correctly)
-
the table was correctly bound to the
ownersDcdata container -
the data container performed a declarative data load for the list of Owner entities
Test: Screen Interaction from Owner Browse to Owner Editor
The second test case is built on the fundamentals of the first one that we just explored. In this case the goal is to test the correct interaction between two screens. The test performs the following steps:
-
the Owner Browser is opened and
AshandMistyare injected as owner test data -
Ashis selected in the Table -
the
editaction is performed (and with it implicitly the Owner Editor is opened)
The assertion is based on the question if the entity that is edited in the Owner Editor is really Ash.
class OwnerBrowseTest {
    // ...
    @Test
    void given_ownerIsSelected_when_editIsPerformed_then_ownerEditorIsOpened() {

        when(ownerListIsLoaded())
                .thenReturn(ashAndMisty);

        OwnerBrowse ownerBrowse = openScreen(OwnerBrowse.class);

        Table<Owner> ownersTable = ownersTable(ownerBrowse);

        ownersTable.setSelected(ash); (1)

        ownersTable
                .getAction("edit")
                .actionPerform(editButton(ownerBrowse)); (2)

        OwnerEdit ownerEdit = findOpenScreen(OwnerEdit.class);

        assertThat(ownerEdit.getEditedEntity()) (4)
                .isEqualTo(ash);
    }

    private Component editButton(OwnerBrowse ownerBrowse) {
        return ownerBrowse.getWindow().getComponent("editBtn");
    }

    private <T extends Screen> T findOpenScreen(Class<T> screenClass) {
        return (T) screens
                .getOpenedScreens()
                .getAll() (3)
                .stream()
                .filter(openedScreen ->
                    openedScreen.getClass().isAssignableFrom(screenClass)
                )
                .findFirst()
                .orElseThrow(RuntimeException::new);
    }

    private Table<Owner> ownersTable(OwnerBrowse ownerBrowse) {
        return (Table<Owner>) ownerBrowse
            .getWindow()
            .getComponent("ownersTable");
    }

    private <T extends Screen> T openScreen(Class<T> screenClass) {
        T screen = screens.create(screenClass);
        screen.show();
        return screen;
    }
    // ...
}| 1 | table.setSelected(…) selects Ash in the table |
| 2 | the edit action of the owners table is performed via the Edit Button |
| 3 | the Screens API lets iterate over the opened screens and filter for a particular type |
| 4 | editor.getEditedEntity() is used to fetch the bound entity that the editor is working on |
In this test case we used additional parts of the CUBA UI API to interact with the application e.g. via ownersTable.setSelected(…). Also, we used it to retrieve some information that is necessary in the test, like the search for an opened screen.
Create Disease Warning Mailing
The third and last test that we want to take a look at, is the logic implemented in CUBA Guide: Create Business Logic in CUBA: the "Disease Warning Mailing" functionality. For the middleware logic of the functionality, we have already created a middleware integration test as described in the CUBA Guide: Middleware Integration Testing.
In the middleware integration test, we covered everything from the Service Interface and below, but left out the UI part.
In this guide, we will now do the opposite. We will create a web integration test that interacts with the UI but mocks out the behavior of the service interface. This way we can control the behavior of this dependency (DiseaseWarningMailingService) and ensure that the UI code interacts with it according to our expectations.
The resulting UI dialog is accessible from the Pet Browser:
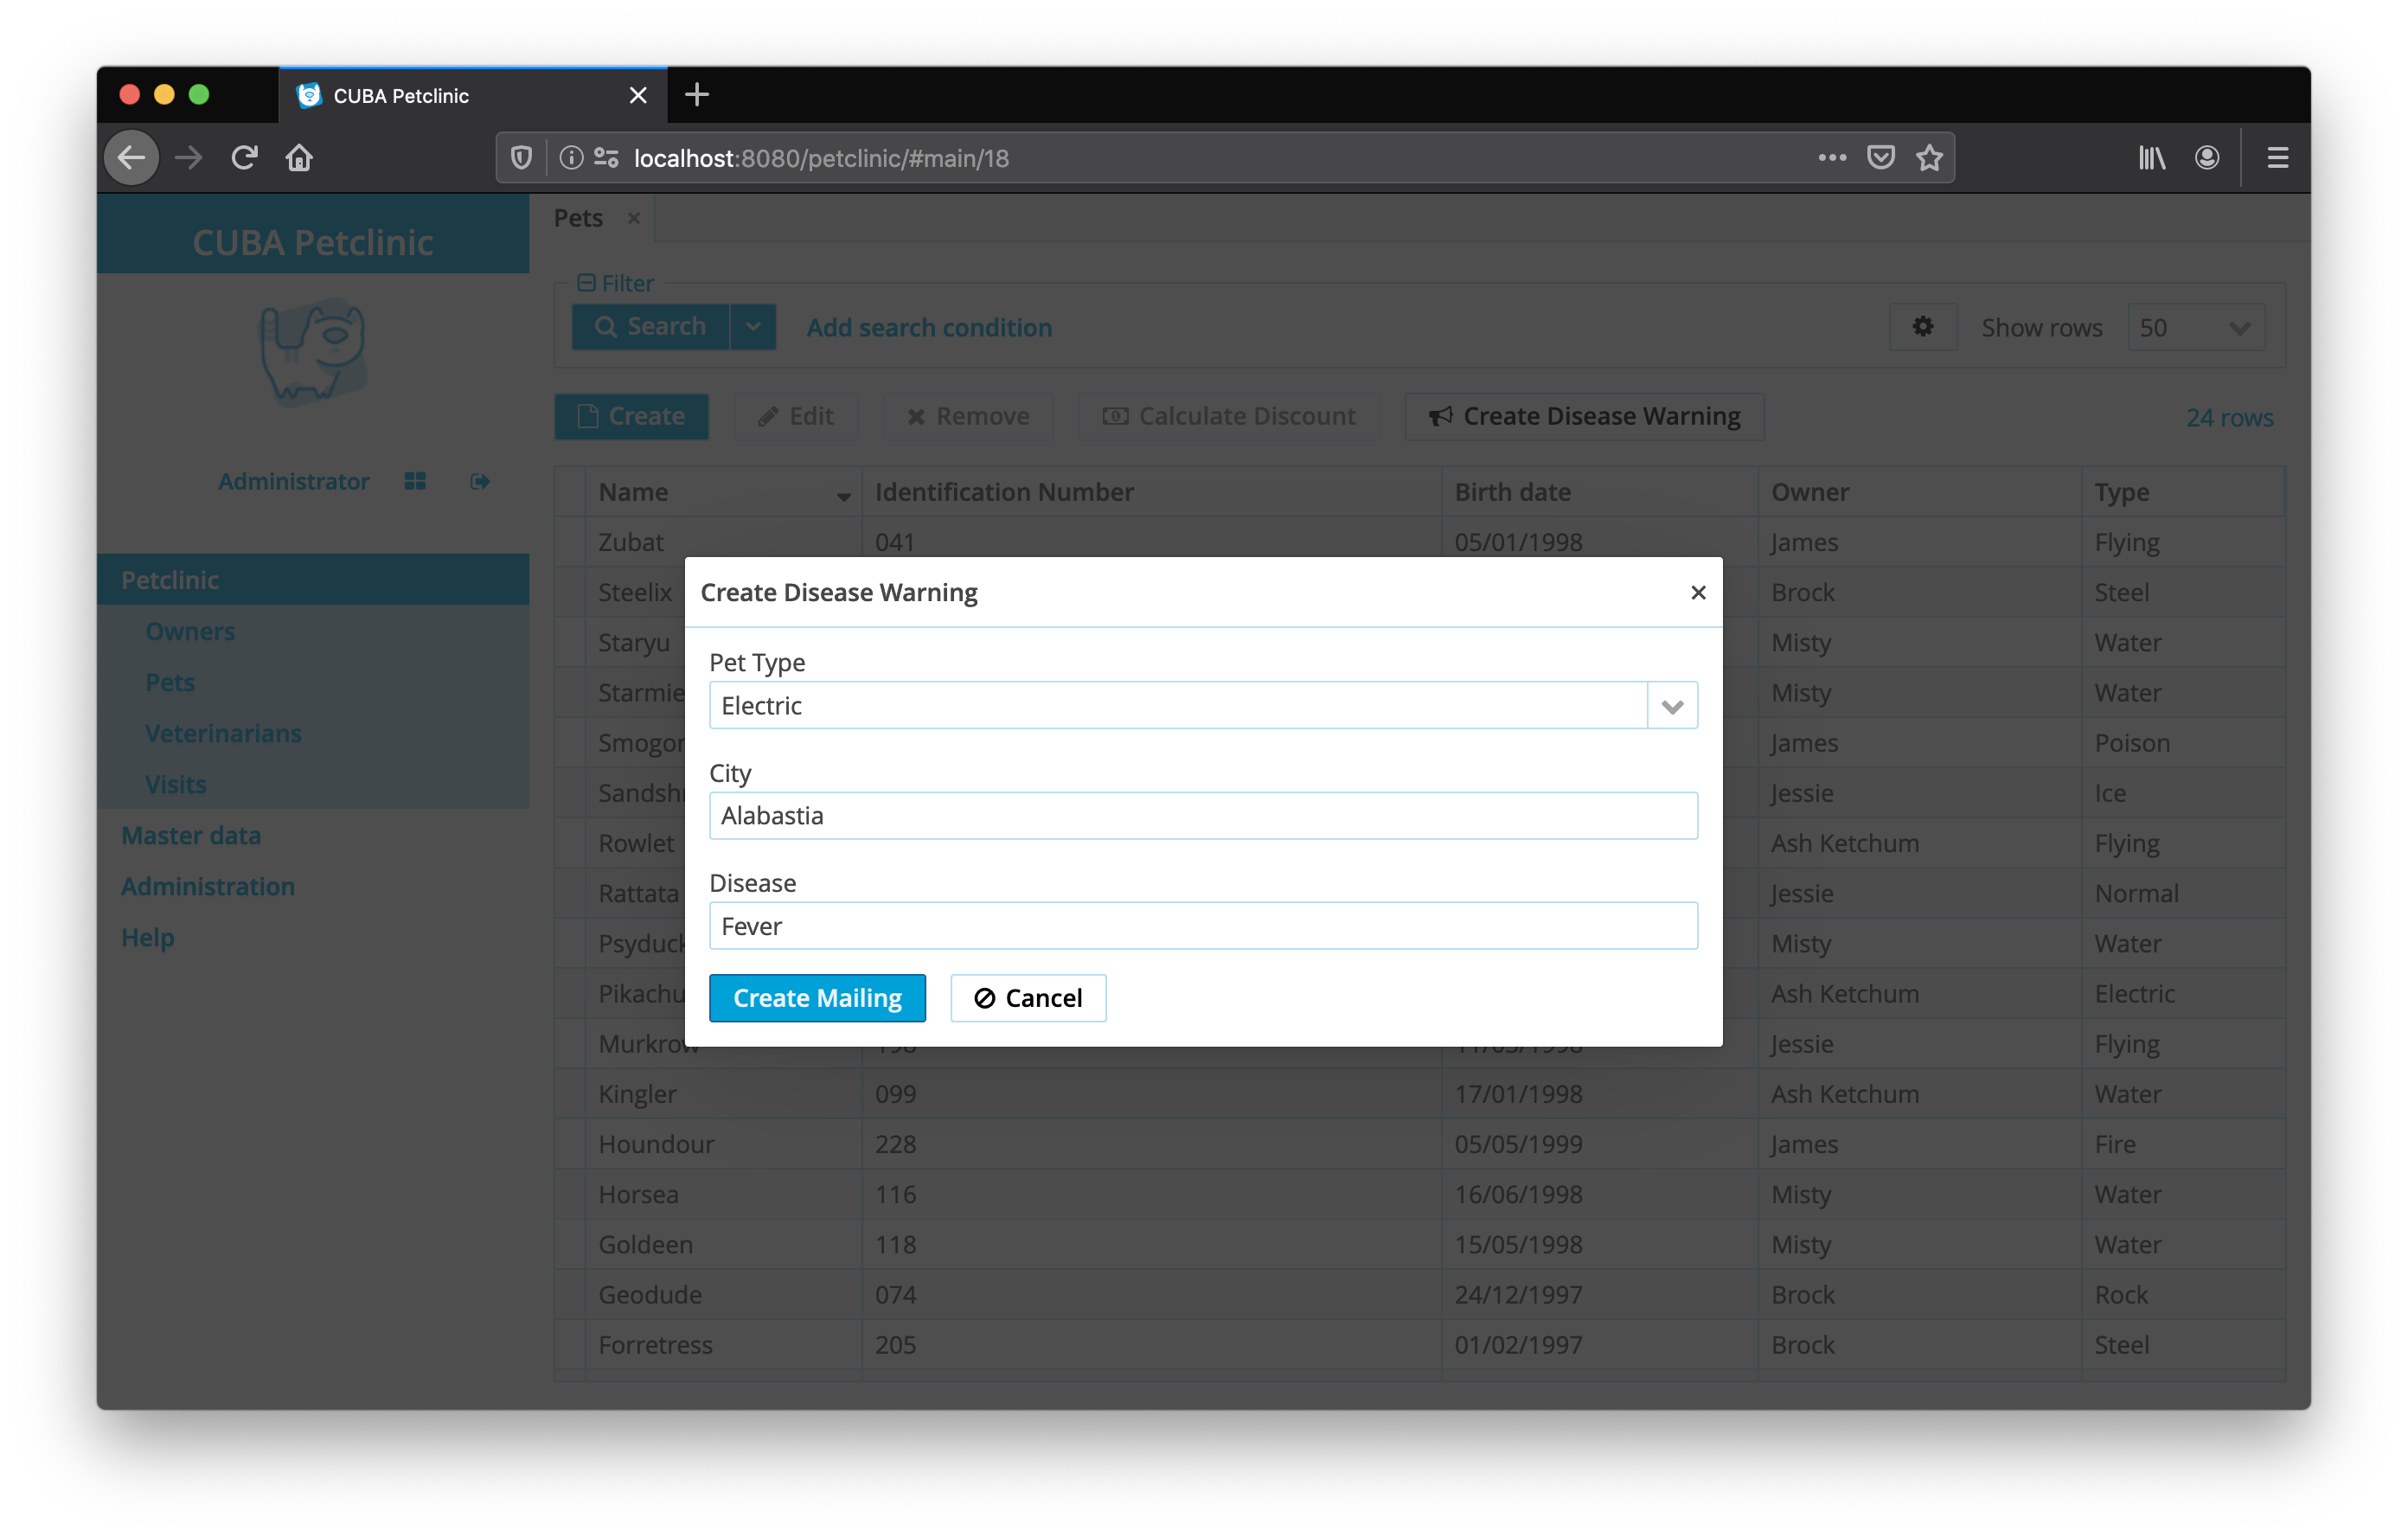
The Test contains the following preconditions:
-
mock dependency
DiseaseWarningMailingService -
open DiseaseWarningMailing Dialog through the Pet Browser
After that there are four test cases that would cover the functionality of the Dialog:
-
when the form is correctly filled, it contains no validation errors
-
when the form is correctly filled, the Mailing is send out
-
when the form is not correctly filled, it contains validation errors
-
when the form is not correctly filled, the Mailing is not send out
In the following listing, only the 1. and 2. test cases are shown. The complete listing can be found on Github: CreateDiseaseWarningMailingTest.java
class CreateDiseaseWarningMailingTest {
    // ...
    private Screens screens;
    private DiseaseWarningMailingService diseaseWarningMailingService;
    private PetType electricType;

    private CreateDiseaseWarningMailing dialog;

    @BeforeEach
    void setUp() {
        setupTestData();
        mockDiseaseWarningMailingService();
        openWarningMailingDialogFromPetBrowse();
    }

    // ...

    private void mockDiseaseWarningMailingService() {

        diseaseWarningMailingService = Mockito.mock(
                DiseaseWarningMailingService.class
        );

        TestServiceProxy.mock(
                DiseaseWarningMailingService.class,
                diseaseWarningMailingService
        ); (1)
    }

    private void openWarningMailingDialogFromPetBrowse() {
        screens = environment.getScreens();
        screens.create(MainScreen.class, OpenMode.ROOT).show();

        PetBrowse petBrowse = openScreen(PetBrowse.class);

        petTable(petBrowse)
                .getAction("createDiseaseWarningMailing")
                .actionPerform(createDiseaseWarningMailingBtn(petBrowse));

        dialog = findOpenScreen(CreateDiseaseWarningMailing.class); (2)

    }

    @Nested
    @DisplayName("When Valid Dialog Input Data, then...")
    class When_SubmitValidDialogInput {

        @BeforeEach
        void fillFields() {
            city(dialog).setValue("Alabastia");
            disease(dialog).setValue("Fever");
            petType(dialog).setValue(electricType);
        }

        @Test
        @DisplayName("Form is valid")
        void then_formIsValid() {

            submitDialog(dialog);

            assertThat(dialog.validationResult().getAll()) (3)
                    .isEmpty();
        }

        @Test
        @DisplayName("Mailing is send")
        void then_mailingIsSend() {

            submitDialog(dialog);

            verify(diseaseWarningMailingService, times(1))
                    .warnAboutDisease(
                            electricType,
                            "Fever",
                            "Alabastia"
                    ); (4)
        }

    }

    private void submitDialog(CreateDiseaseWarningMailing dialog) {
        dialog
                .getWindow()
                .getAction("createDiseaseWarningMailing")
                .actionPerform(createMailingBtn(dialog));
    }


    private Component createMailingBtn(CreateDiseaseWarningMailing dialog) {
        return component(dialog, "createDiseaseWarningMailingBtn");
    }

    private TextInputField<String> city(CreateDiseaseWarningMailing dialog) {
        return (TextInputField<String>) component(dialog, "city");
    }

    private Component component(Screen screen, String componentId) {
        return screen
                .getWindow()
                .getComponent(componentId);
    }

    //...
}| 1 | The DiseaseWarningMailingService is mocked and registered in the environment |
| 2 | Dialog Screen is opened from the Pet Browser |
| 3 | Assertion that the validation results of the form contains no error |
| 4 | Mockito’s verify method allows asserting on the interaction with the dependency |
In the assertion parts of the tests, there are two things relevant that haven’t been discovered until now.
The first test case When_SubmitValidDialogInput.then_formIsValid() checks if the dialog contains any validation errors.
The validation is performed manually in the CreateDiseaseWarningMailing screen, as it is not a StandardEditor, but rather a custom Screen. Due to this, there is no way to retrieve the Validation errors from outside of the screen. also not for the test.
Therefore, a dedicated method in the production Screen was introduced - CreateDiseaseWarningMailing.validationResult(), which looks like this:
public class CreateDiseaseWarningMailing extends Screen {
    // ...
    ValidationErrors validationResult() {
        return screenValidation.validateUiComponents(
                asList(city, disease, petType)
        );
    }
}
This method is used inside the Controller to perform the validation. But it is also accessible for the test case, to retrieve the ValidationErrors object from the outside in order to make assertions on it.
The second test case When_SubmitValidDialogInput.then_mailingIsSend() uses the DiseaseWarningMailingService mock to verify that the System under test (CreateDiseaseWarningMailing) is interacting with the dependency in the correct way.
In the test case the expected interaction with the dependency is expressed. Mockito provides a verify method for that:
verify(diseaseWarningMailingService, times(1))
        .warnAboutDisease(
                electricType,
                "Fever",
                "Alabastia"
        );
It translates to the following interaction expectation:
Verify that on the
diseaseWarningMailingServiceobject the methodwarnAboutDiseasewith the three parameterselectricType, "Fever", "Alabastia"is called exactly once.
Mockito takes that interaction expectation and makes sure that this is true. If during the test case this interaction does not occur, the test fails.
With that we have successfully tested the UI code that is part of the overall "Create Disease Warning Mailing" functionality. The Middleware integration test verifies that the warnAboutDisease method itself works as expected.
Sneferu
After seeing different implementations of web integration tests, you should have a basic idea on how to interact with the UI through a web integration testing. CUBAs UI APIs are for the most part capable of interacting with the various UI components and screens programmatically.
But as these APIs are optimized for production application code, using them for remote-controlling CUBA UIs (this is what tests oftentimes do) is not their main focus. This results in some boilerplate code in the web integration tests like this:
class OwnerBrowseTest {
    // ...
    private <T extends Screen> T findOpenScreen(Class<T> screenClass) {
        return (T) screens
                .getOpenedScreens()
                .getAll()
                .stream()
                .filter(openedScreen ->
                    openedScreen.getClass().isAssignableFrom(screenClass)
                )
                .findFirst()
                .orElseThrow(RuntimeException::new);
    }
}
Writing this code takes away the developer from the main task at hand: write test cases to verify the correct behavior of the application.
Sneferu is a testing library designed to make writing web integration tests for CUBA easier in order to concentrate on writing verification test cases. With its specific DSL and the ability to create higher level abstractions on your own, it also allows us to express the test cases with a higher level language. This helps to create a more maintainable test suite.
In order to understand the difference between a regular CUBA web integration test and a Sneferu web integration test, let’s revisit two test cases of the OwnerBrowseTest and CreateDiseaseWarningMailingTest.
Owner Browse - Revisited
The Owner Browse Test contains a test case that verifies the correct interaction between the OwnerBrowse Screen
and the OwnerEdit Screen. The test case written with the help of Sneferu looks like this:
import static de.diedavids.sneferu.ComponentDescriptors.*;
import static de.diedavids.sneferu.Interactions.*;

class OwnerBrowseSneferuTest {

    @RegisterExtension
    SneferuTestUiEnvironment environment =
            new SneferuTestUiEnvironment(PetclinicWebTestContainer.Common.INSTANCE)
                    .withScreenPackages(
                            "com.haulmont.cuba.web.app.main",
                            "com.haulmont.sample.petclinic.web"
                    )
                    .withUserLogin("admin")
                    .withMainScreen(MainScreen.class);

    // ...

    @Test
    void given_ownerIsSelected_when_editIsPerformed_then_ownerEditorIsOpened(
        @StartScreen StandardLookupTestAPI<Owner, OwnerBrowse> ownerBrowse,
        @SubsequentScreen StandardEditorTestAPI<Owner, OwnerEdit> ownerEdit
    ) {

        ownerBrowse
                .interact(selectInList(table("ownersTable"), ash))
                .andThen(click(button("editBtn")));

        assertThat(ownerEdit.screen().getEditedEntity())
                .isEqualTo(ash);
    }

    //...

}
The Test UI environment in this case is a special Sneferu class: SneferuTestUiEnvironment, which adds certain capabilities to the environment.
The test case itself declares two parameters. This is a particular feature of JUnit 5, which allows expressing test dependencies required for the test. In this case, the first parameter is annotated with @StartScreen, which means that Sneferu will automatically open the screen and when the test starts, it is possible to directly interact with the screen. The type: StandardLookupTestAPI<Owner, OwnerBrowse> ownerBrowse defines what kind of Screen the test expects.
Under the hood, an instance of OwnerBrowse will be shown and is wrapped in a class called StandardLookupTestAPI that provides further abstractions relevant for test case interactions with the Screen.
The second parameter is the OwnerEdit Screen, that we need in this test case. Unlike the Owner Browser, this screen is not the start screen for our test-screen-interaction. Instead it is a screen to be opened automatically by the application. But the test case needs to get a reference to it in order to interact with this Screen afterwards as well. For this scenario the @SubsequentScreen annotation is used.
In order to interact with a Screen, the ScreenTestAPI wrapper classes provide various methods to do so.
ownerBrowse.interact(…) is used for that kind of interaction. It expects an interaction object as a parameter.
Sneferu provides a lot of Interactions out-of-the-box. The static import de.diedavids.sneferu.Interactions.*; allows access to methods like selectInList directly, so that the test case is expressed with little friction.
In this case the Interaction Interactions.selectInList(table("ownersTable"), ash) selects a particular entity
in a List component. It takes two parameters: the first is a reference to a component that the interaction should be acted upon, while the second parameter defines the entity that should be selected.
Interactions can be chained via interact(…).andThen(…) in order to perform multiple interactions one after another.
After the interaction is performed, the application should have opened the Owner Editor Screen. ownerEdit now acts as a reference to this recently opened screen. So it is possible to interact with this screen now. In this case the underlying Screen object is retrieved to compare the edited entity via ownerEdit.screen().getEditedEntity().
Disease Warning Mailing - Revisited
The second example with the Disease Warning Mailing written in Sneferu looks like this:
class DiseaseWarningMailingSneferuTest {
    //...
    @Nested
    @DisplayName("When Valid Dialog Input Data, then...")
    class When_SubmitValidDialogInput {
        // ...
        @Test
        @DisplayName("Mailing is send")
        void then_mailingIsSend(
            @StartScreen StandardScreenTestAPI<CreateDiseaseWarningMailing> dialog
        ) {

            dialog
                    .interact(enter(textInputField("city"), "Alabastia"))
                    .andThen(enter(textInputField("disease"), "Fever"))
                    .andThen(select(lookupField("petType"), electricType))
                    .andThen(click(button("createDiseaseWarningMailingBtn")));

            verify(diseaseWarningMailingService, times(1))
                    .warnAboutDisease(
                            electricType,
                            "Fever",
                            "Alabastia"
                    );
        }
    }
}
It is similar to the first test case. Once again, the start screen is injected (in this case it is of type StandardScreenTestAPI).
Then interactions are performed against the screen. Afterwards the same assertion is expressed as seen before: the diseaseWarningMailingService should be called once.
As we have seen, Sneferu allows us to ease the programmatic interactions with the focused Interaction API. Furthermore, it removes the need to write a lot of boilerplate code with the CUBA UI APIs.
More information on the library can be found in the CUBA Marketplace: Sneferu or on Github: mariodavid/sneferu.
Summary
In this guide we learned about the way on how to write and execute web integration tests for CUBA. In the beginning we walked through the coverage area that a web integration test has as well as its limitations.
A web integration test contains the UI Logic with its Java Controllers and the corresponding XML Screen descriptors. It does not cover execution of the middleware parts like Service Implementations or Data Loading.
After that we took a look into three example web integration tests: PetEditTest, OwnerBrowseTest and CreateDiseaseWarningMailingTest.
These tests showed how to programmatically open screens via the TestUiEnvironment as well as various techniques
to interact with the components on the screen. Additionally we mocked the boundaries of the web integration test and verified that the interactions with the dependency are performed correctly.
Finally, we looked into an alternative way of expressing web integration tests in CUBA: Sneferu. A library specifically designed for the purpose of writing web integration tests fast, easy and more expressive.
The combination of Web integration tests and Middleware integration tests (as learned in the guide: Middleware Integration Testing in CUBA Applications) provides a solid safety-net. With the verified interactions between the Service boundaries the overall test coverage can be quite good. With that it enables you to iterate fast on your application, but at the same time be sure that the functionality is still working as expected.