Middleware Integration Testing in CUBA Applications
Test automation is the key to every successful application development process since it normally gives a high positive return on investments for QA efforts. CUBA applications are built on the Java ecosystem which has very powerful and mature test automation capabilities. In this guide you will learn how to leverage those capabilities.
First you will understand how testing in general works in a CUBA application. Afterwards, this guide will concentrate on the area of integration testing in the middleware layer.
What we are going to build
This guide enhances the CUBA Petclinic example to show how existing features can be tested in an automated fashion:
-
automatic creation of a Visit for a given Pet Identification Number
-
automatic "Disease Warning Mailing" for endangered Pets
Requirements
Your development environment requires to contain the following:
-
CUBA Studio as standalone IDE or as an IntelliJ IDEA plugin
Download and unzip the source repository for this guide, or clone it using git:
Additional Testing Dependencies
This guide uses JUnit 5 as well as AssertJ to develop and run the automated integration test cases. Therefore, the following dependencies should be expressed in the build.gradle for all the three modules (global, core and web):
configure([globalModule, coreModule, webModule]) {
    // ...
    dependencies {
            testCompile('org.junit.jupiter:junit-jupiter-api:5.5.2')
            testCompile('org.junit.jupiter:junit-jupiter-engine:5.5.2')
            testCompile('org.junit.vintage:junit-vintage-engine:5.5.2')

            testCompile('org.assertj:assertj-core:3.11.1')

    }
    // ...
}
Example: CUBA petclinic
The project that is the basis for this example is CUBA Petclinic. It is based on the commonly known Spring Petclinic. The CUBA Petclinic application deals with the domain of a Pet clinic and the associated business workflows to manage a pet clinic.
The underlying domain model for the application looks like this:

The main entities are Pet and Visit. A Pet is visiting the petclinic and during this Visit a Vet is taking care of it. A Pet belongs to an Owner, which can hold multiple pets. The visit describes the act of a pet visiting the clinic with the help of its owner.
Overview
Test automation is a commonly known best practice in the industry of software development for several decades. It allows writing a small test application that executes a particular sub-part of the production application and verifies its correct behavior.
The term production, as it is used in this guide, refers to the application code that is inside the application, just to differentiate it from the code that is defining the test case (the test code). It does not mean production as in "the production system" used by your customers.
In the Java ecosystem test automation has a long tradition. One famous example of this is the testing framework JUnit, which was one of the very first testing frameworks out in the market.
In a CUBA application, just like any other Java application, it is possible and recommended to write automated tests that exercise parts of the target application.
In a test case (which is expressed as another Java class in a special test source directory) instances of production classes are instantiated and methods are executed. Afterwards, the results are verified through a programmatic comparison of an expected result against the actual result. Depending on this comparison, the test case is either treated as "success" or "failure".
A CUBA application is divided into two parts: the middleware part and the client part. The middleware consists of a combination of the core and the global module in the source code. It normally contains the majority of the business logic, integrations to other systems and the database related interactions.
This guide is only about testing the middleware part of a CUBA application, since for the client different patterns and testing strategies apply. Therefore, this kind of testing is covered in another dedicated guide.
Test Environments
Depending on how production code is executed in a test environment, this environment needs to fulfil certain criteria. If e.g. a test exercises a production class that interacts with a database, this database has to be up and running in that environment and the production code must have a proper connection to it.
If a test case, on the other hand, executes a production class that contains business logic to sum up order amounts for a customer, the execution environment can be much simpler and without dependencies on other parts.
When it comes to the CUBA middleware, both of those environment scenarios can be instantiated to execute test classes. The first variant with running dependencies like a database is normally referred to as an Integration test. The scenario where the production class is instantiated without any surrounding environment support is called a Unit test.
In the next section you will learn about the differences of those two environment types. Afterwards, this guide concentrates on the integration testing part by testing the two scenarios for the petclinic application.
Middleware Integration Testing
In this environment the production application is started partially. The integration test environment for a CUBA middleware is oftentimes a common way of running a test case. This means that all the CUBA platform classes work the way just as in the production code of the application.
The DataManager interface, for example, when invoking dataManager.load(Customer.class).id(123).one() will actually go against the database and fetch the customer with the ID 123. The same is true for the production code that was written in your application: CustomerCreationService will try to create a Customer in the database.
The integration test environment contains the following environmental parts:
-
Spring application context
-
Connection to external database
-
Platform APIs work as in production codes
It takes a couple of seconds before the environment is available to the test case and the test actually starts.
Database Connection
CUBA integration tests use the same database connection that is established when running the CUBA application. In the case of HSQLDB CUBA Studio takes care of having the database running when executing the test case.
By default the database instance is shared between the test environment and the local application. It means that data defined locally when the application is run is also available in the test case execution. Furthermore, if the test case changes the data in the database, it is also changed when you start the application the next time.
| Sharing the data between the two environments is convenient and can be helpful but also can cause some level of non-determinism. You might face the situation of having problems expressing the correct assertions in the test case, because you cannot reliably determine how much / which data is in the database or you accidentally change the data through the test case. In this case it is also possible to split the databases between the two environments to avoid such behavior. |
Test Container
The Test container is an object in the test case, that is mainly responsible for starting up and managing the integration test environment. It is supposed to be used in the test class as an object that sets up the test environment:
-
starts the Spring application context
-
establishes a DB connection
-
instantiates all CUBA platform APIs
-
activates all application components and their configuration
CUBA Studio generates the TestContainer class into the test source directory of the core module. Next you will see an example usage of the PetclinicTestContainer:
public class SampleIntegrationTest {

    @RegisterExtension (1)
    public static PetclinicTestContainer testContainer =
            PetclinicTestContainer.Common.INSTANCE; (2)

    @Test
    public void persistenceAPI_canBeRetrieved_fromTheTestContainer() {

        Persistence persistence = testContainer.persistence(); (3)

        assertNotNull(persistence);
    }
}| 1 | the JUnit integration test uses the PetclinicTestContainer Extension |
| 2 | the petclinic test container instance is added as a field in the test class |
| 3 | in the test cases the container can be used to interact with the test environment |
| This guide uses JUnit 5 as the testing library for examples. CUBA supports multiple testing frameworks like Spock, but by default it ships with JUnit. |
Middleware Unit Testing
Besides the integration test environment, it is also possible to create test cases that do not spin up the Spring application context or any CUBA platform APIs at all. As for the above described use case (Sum building of order amounts), not having to start the test environment can be beneficial as well.
The two main benefits of writing unit tests in an isolated fashion without an integration test environment are:
-
locality of the test scenario
-
test execution speed
But there are also downsides or limitation when using unit tests. This whole topic is a part of another dedicated testing guide and is not discussed here.
Tests for Petclinic Functionality
In the next section you will learn how to put all this theory into action by implementing integration test cases that verify the correct behavior of features introduced in the Working with Data in CUBA guide.
Working with JUnit Tests in CUBA Studio
The test cases in the Petclinic example can be executed either by Gradle or directly within CUBA Studio via its UI.
The corresponding gradle task is: ./gradlew test (Linux, Mac) or gradlew.bat test (Windows)
To see test cases in the File list of the project, you need to switch from CUBA to Project in the Project Tool Window.

In CUBA Studio the test execution is done by creating a run configuration for the test case and executing this run configuration. A test case or class can either be executed by the shortcut CRTL+F5 (Windows) / CMD+R (Mac) or alternatively by using the Run icon on the test case / test class:

CUBA Studio leverages the standard IntelliJ IDEA capabilities around testing and test execution. More information can be found in the IDEA documentation.
Automatic Visit Creation
The first test case is about the automatic visit creation functionality of the Petclinic application. In the Visit browse screen, a user can create a new visit by entering the Pet Identification Number as a quick action. The software will go ahead and create a visit for the entered Pet.
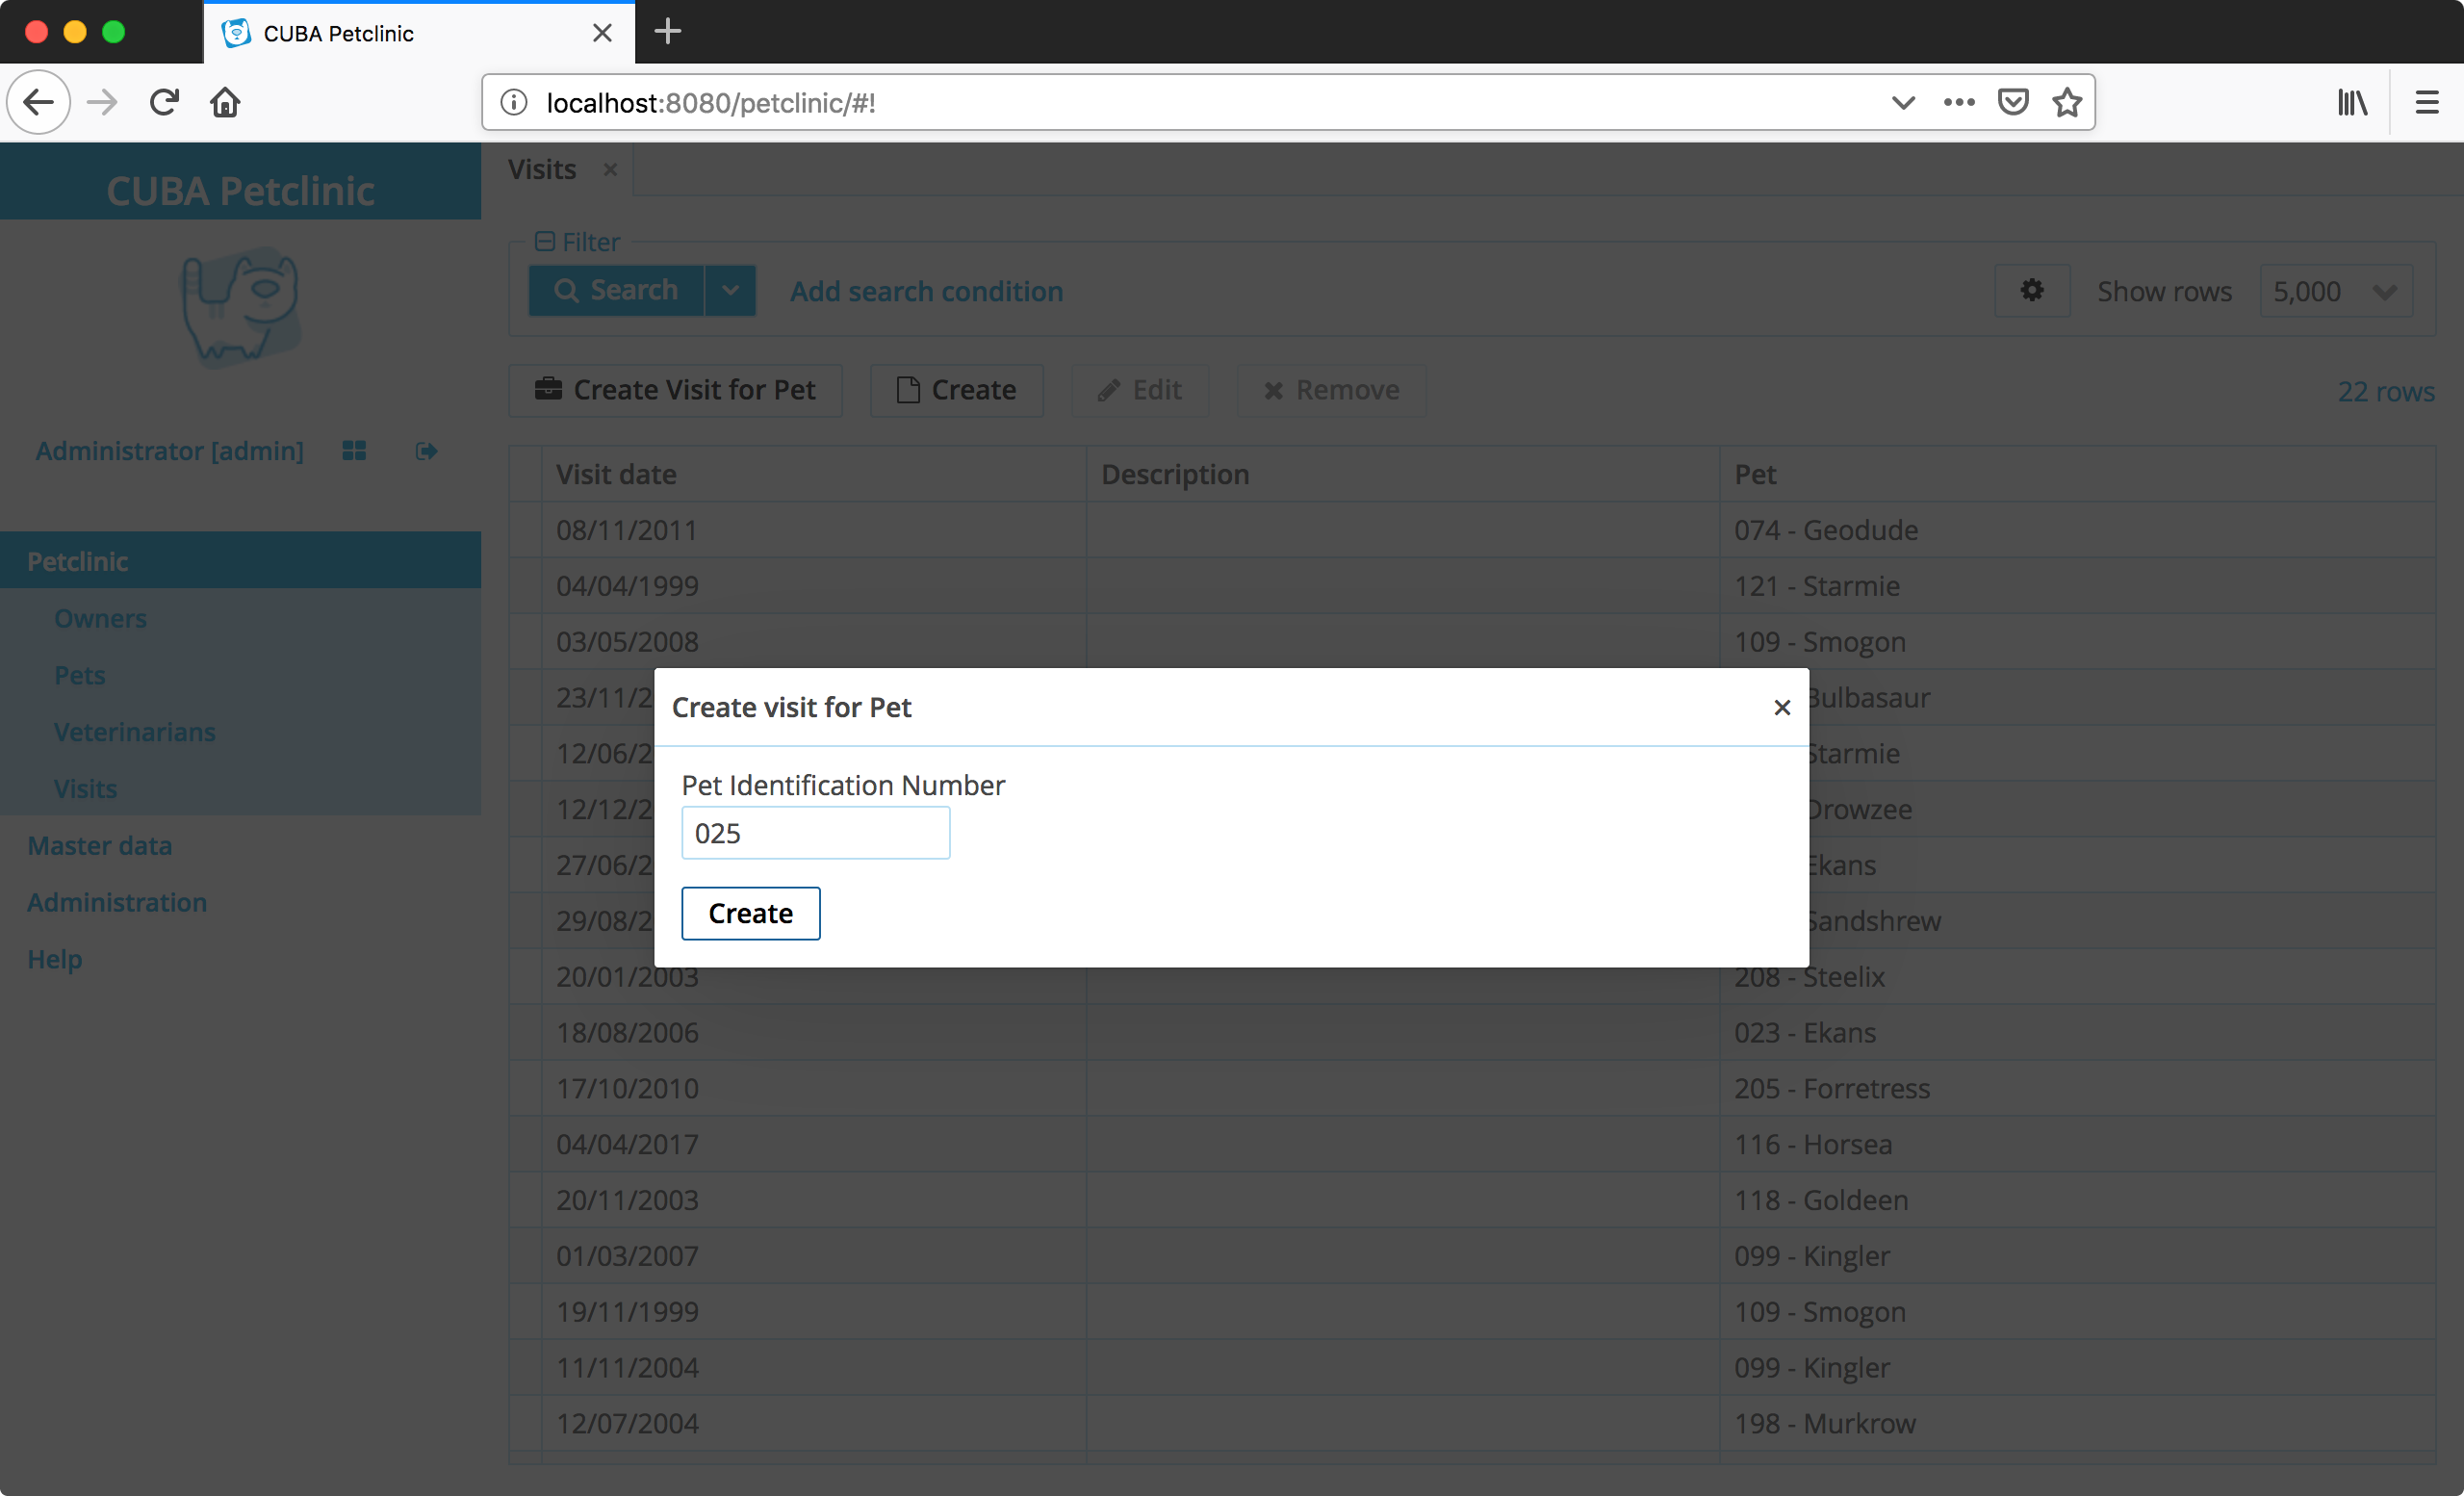
Part of this feature’s implementation is a CUBA service called VisitService triggered from the UI. It contains one method Visit createVisitForToday(String identificationNumber) that is the subject of the test case.
| Although the feature includes a UI part, this will not be part of the automated testing. It is quite common to test certain subparts of the implementation in isolation (as you will see). That being said, there is still a need for a real end-to-end test case to verify all the parts work together correctly. But this is out of this guide’s scope. |
Implementation of the Functionality
Before looking into the first test case, here is a recap of what the VisitService is doing in the implementation:
-
it looks up the Pet by the given Identification Number
-
in case the Pet is found, it will use it
-
in case no Pet is found, it will not create a Visit
-
-
it creates a new instance of a Visit with the correct attributes
-
it figures out the correct Pet and assigns it to the Visit
-
it uses
todayas thevisitDate
-
-
it stores the newly created Visit
The implementation of this functionality is shown below:
@Service(VisitService.NAME)
public class VisitServiceBean implements VisitService {
  @Inject
  protected DataManager dataManager;
  @Inject
  protected TimeSource timeSource;
  //...
  @Override
  public Visit createVisitForToday(String identificationNumber) {
    Optional<Pet> pet = loadPetByIdentificationNumber(identificationNumber);  (1)

    if (!pet.isPresent()) {
      return null;
    }

    return saveVisit( (2)
        createVisitForPet(pet.get())
    );
  }

  private Visit createVisitForPet(Pet pet) {
    Visit visit = dataManager.create(Visit.class);
    visit.setPet(pet);
    visit.setVisitDate(timeSource.currentTimestamp());
    return visit;
  }

  private Visit saveVisit(Visit visit) {
    return dataManager.commit(visit);
  }

  private Optional<Pet> loadPetByIdentificationNumber(String identificationNumber) {
    return dataManager.load(Pet.class)
        .query("e.identificationNumber = ?1", identificationNumber)
        .optional();
  }
  //...
}| 1 | the Pet is searched by the given Identification Number returning an Optional<Pet> |
| 2 | in case a Pet is found, a corresponding Visit will be created and stored |
Test Class Setup
To implement the defined test case, first let’s look at the integration test harness of the test case. It is based on the description of the SampleIntegrationTest from above. In this test there are some noteworthy additions to simplify the test cases.
public class VisitServiceTest {
    @RegisterExtension
    public static PetclinicTestContainer testContainer = PetclinicTestContainer.Common.INSTANCE;
    private static VisitService visitService; (1)
    private static PetclinicVisitDb db;

    private Visit visit;
    private Pet pikachu;

    @BeforeAll
    public static void setupEnvironment() {
        visitService = AppBeans.get(VisitService.class);

        db = new PetclinicVisitDb( (2)
            AppBeans.get(DataManager.class),
            testContainer
        );
    }

    @BeforeEach
    public void loadPikachu() { (3)
        pikachu = db.petWithName("Pikachu", "pet-with-owner-and-type");
    }

    // different test cases...

    @AfterEach
    public void cleanupVisit() { (4)
        db.remove(visit);
    }
}| 1 | the VisitService is the system under test (SUT) in this test case |
| 2 | the PetclinicVisitDb class acts as a container for all relevant interactions with the database like test data and verification |
| 3 | loadPikachu is an example of a method that should be executed before each test case in this class |
| 4 | the cleanupVisit does the data cleanup in the DB after each test case execution |
The JUnit Annotations @BeforeEach and @AfterEach are used to execute certain parts of the code before / after each test case.
Test Utility Methods
One important piece here is the class PetclinicVisitDb and its usage via the db variable.
This class encapsulated Database interactions tailored towards the test class VisitServiceTest. It has the following API:
public class PetclinicVisitDb {

  public Pet petWithName(String name, String view) { /* ... */ }

  public void remove(Entity<UUID> entity) { /* ... */ }

  public Optional<Pet> petWithIdentificationNumber(
          String identificationNumber
  ) { /* ... */ }

  public Long countVisitsFor(Pet pet) { /* ... */ }

  public Long countVisits() { /* ... */ }

}
Under the hood the class interacts with the dataManager and other various things to provide this specific API to the test cases. This class is a combination of an implementation of the Test Utility Method pattern and the
Back Door Manipulation Pattern.
It is not strictly necessary to put this logic into a dedicated class, but it oftentimes frees up the test classes from various helper methods or inline code that will increase the noise in the test case itself (as you can see in the first test case).
Arrange Act Assert
The general pattern of how most test cases in this guide are defined is called Arrange-Act-Assert:
First there is a phase of test data setup, or verification of test data (Arrange). This is necessary to ensure the test case has a stable set of test data to start from. Next, the implementation is exercised with the desired input parameters (Act). In the last phase, the verifications are executed to see if the code changed the system in the desired ways (Assert).
First Test Case
Based on the implementation description it is possible to identify a couple of test cases, that describe the above mentioned behavior:
-
createsANewVisit_forTheCorrectPet- verifies1.a,2.aand3. -
createsANewVisit_withTheCorrectVisitInformation- verifies1.a,2.band3. -
createsNoVisit_forAnIncorrectIdentificationNumber- verifies1.b
Let’s look into the test case which checks for the correct Pet to be associated to the new Visit:
class VisitServiceTest {
    // ...
    private Visit visit;
    private Pet pikachu;

    @BeforeEach
    public void loadPikachu() {
        pikachu = db.petWithName("Pikachu", "pet-with-owner-and-type");
    }

    @Test
    public void createVisitForToday_createsANewVisit_forTheCorrectPet() { (1)
        // given: there is one visit associated to pikachu
        assertThat(db.countVisitsFor(pikachu))
            .isEqualTo(1);
        // when: logic is executed for pikachus identification number
        visit = visitService.createVisitForToday(
                pikachu.getIdentificationNumber()
        );
        // then: there are two visits associated to pikachu
        assertThat(db.countVisitsFor(pikachu)) (2)
            .isEqualTo(2);
    }
}| 1 | the method name of the JUnit test case describes the high level narrative of the test case |
| 2 | the assertions are expressed through a corresponding AssertJ assertion |
As described above, the test case uses the Arrange-Act-Assert pattern with the three steps, that are described through the given, when and then comments in the test case.
With the passing in the Identification Number of Pikachu, and then afterwards assert that the count of visits was increased in the DB, it is safe to say that the VisitService correctly did a lookup from the Identification Number to the correct Pet entity (1.a).
Furthermore, we can conclude that 2.a and 3. are also handled correctly since in the
assertion we do another DB lookup of visits by the foreign key to the Pikachu Pet instance and verify the amount was increased exactly by one.
The assertThat statement compares the two values db.countVisitsFor(pikachu) and 2. If they are the same, the test is treated as success, otherwise it is treated as failure.
Database Seed Data
One thing to note here is that there is already some data in the database. Not only Pets like Pikachu are already stored, Visit information is stored as well. This is because in the Petclinic application the 30.create-db.sql file contains seed data that is used for demonstration purposes. This has both upsides and downsides when it comes to test automation.
On the one hand, it makes the test data setup easier, as there is already some data to rely on. It is not necessary to create the required Pet, PetType and Visit entities programmatically
before any test case can be executed. It makes the test creation easier and faster.
On the other hand, relying on test data that is defined outside the test case also comes with a maintenance cost. It generally makes the test cases less resilient to changes of that test data. Since this is central test data that all test cases share (as well as the running application), the situation can be even worse. Also, is makes the test a little more obscure, since it is hard to see those implicit assumptions about certain data being available.
To mitigate that situation the first test case contains a Guard Assertion: assertThat(db.countVisitsFor(pikachu)).isEqualTo(1);. It ensures that the test data setup is what the test expects to function correctly. In case this precondition is not given, the test will fail immediately pointing to that problem. Without this precondition, a downstream error would have occurred, and it would be harder to determine
the root cause of the failing test case. Besides the test case, it also helps the reader of the test case to understand it better.
It is possible to improve the situation even further but still stay with the central seed data setup. In fact, for the the test case it is irrelevant if there are 1, 2 or 85 visits in the database for the pet. The only thing that is relevant is that the amount should be increased exactly by one after the execution.
To make the test more independent on the amount of Visit data, the test can capture the amount before the execution like this:
class VisitServiceTest {
    @Test
    public void createVisitForToday_createsANewVisit_forTheCorrectPet() {
        // given: the amount of visits for pikachu is captured
        Long visitAmountBefore = db.countVisitsFor(pikachu);
        // when: logic is executed for the pikachus identification number
        visit = visitService.createVisitForToday(
                pikachu.getIdentificationNumber()
        );
        // then: there is one more visit associated to pikachu
        assertThat(db.countVisitsFor(pikachu))
            .isEqualTo(visitAmountBefore + 1);
    }
}
With that change the test will be more resilient regardless of how many visits for Pikachu are inserted by the environment. This variant is an implementation of the Delta Assertion Pattern.
Other Test Cases for CreateVisitForToday
For this example the two additional test cases will not be discussed in this guide as they are quite similar compared to the test case from above. Instead you can look them up in the corresponding example project:
Disease Warning Mailing
The next functionality that should be tested is the ability to send out a "Disease Warning Mailing" for the endangered pets. As with the previous feature, this functionality is similarly defined in a Service called DiseaseWarningMailingService within its method warnAboutDisease.
The implementation of the feature contains the following parts:
-
All potentially endangered Pets will be located
-
that are of the given type
-
live in the corresponding city
-
have a valid Email Address through its Owner
-
-
An Email will be sent for each Pet containing information about the Disease
For sending out the emails, we’ll use the standard CUBA functionality for email sending: EmailerAPI will be leveraged.
Test Class Setup
The setup of the test cases will be very similar to the test class shown before. Next to the test case, there is a class containing the Test Utility Methods called PetclinicMailingDb. Additionally in this case certain test data is loaded from the DB at the beginning of each test. It also contains Guard Assertions that this data is really present (as you have seen before).
public class DiseaseWarningMailingServiceTest {

    private final String ALABASTIA = "Alabastia";
    private final String ELECTRICAL_OVERCHARGING = "Electrical overcharging";
    // ...
    private PetType electricType; (1)
    private List<Pet> electricPetsFromAlabastia;

    @BeforeEach
    public void loadTestDataAndVerifyItsCorrectness() {  (2)
        // given: there is an 'Electric' pet type
        electricType = db.petTypeWithName("Electric");

        assertThat(electricType)
            .isNotNull();

        // and: there is exactly one electric pet from Alabastia
        electricPetsFromAlabastia = db.petsWithTypeFromCity(
            electricType,
            ALABASTIA,
            "pet-with-owner-and-type"
        );

        assertThat(electricPetsFromAlabastia)
            .hasSize(1);
    }

    // different test cases...

    private int warnAboutElectricalOverchargingIn(String city) { (3)
        return diseaseWarningMailingService.warnAboutDisease(
            electricType,
            ELECTRICAL_OVERCHARGING,
            city
        );
    }

    @AfterEach
    public void clearOutgoingEmails() { (4)
        db.outgoingEmails()
            .forEach(db::removeEntity);
    }
}| 1 | electricType and electricPetsFromAlabastia are containers for common test data in this test class |
| 2 | the @BeforeEach method loads common test data and verifies its correctness |
| 3 | the system under test (SUT) invocation is extracted into a Test Utility Method |
| 4 | after each test case, the Outgoing Emails are cleaned up |
As seen in the last callout (4), there is a special way on how to work with and verify the Email Sending functionality.
State Verification vs. Behavior Verification
In the Case of the Email Sending, when you think about how it is possible to verify that a particular Email is correctly sent out to a target Owner, you can consider it a little bit difficult to verify. The test case can’t assure that an Email was actually sent out, because it is not directly involved in this interaction. Mainly you have the following verification options:
-
check for the received Email in a real existing valid Email Account programmatically
-
emulate an SMTP server in a test case and verify that a particular message was received from the application
-
mock the
EmailerAPIimplementation by having a different implementation in the Spring configuration and verify it was called correctly
Those three different approaches can be categorized either as a State Verification or a Behavior Verification. A behavior verification looks at the two collaborators (classes, modules or even systems) and, based on the fact that a particular interaction took place, derives the conclusion that the verification is correct. State verifications, on the other hand, do not look into how the system interacts with other collaborators, but instead look at the status after the execution and checks if the desired state is reached.
In this regard, 1. is a State verification, while 2. and 3. are different kinds of behavior verifications.
Verification Approach for CUBA Email Functionality
The EmailerAPI has a special method List<SendingMessage> sendEmailAsync(EmailInfo info); used in the implementation. In particular, this async part is handled like this: the API call stores the EmailInfo object into a CUBA database Table called EmailSending with a particular SendingStatus: QUEUE. Then a scheduled task is periodically run, it picks up those emails and tries to send them out. As this happens independently of the thread that executed emailerAPI.sendEmailAsync(emailInfo), this process is asynchronous.
This knowledge allows us to uncover the forth option of verification:
4. Verify database rows to appear in the EmailSending CUBA database table used by the EmailerAPI which represent outgoing Email requests for CUBA Email functionality.
|
This option is also a state verification. Generally, it is preferable to use the state verification, as those verifications are usually more resilient when it comes to changes in the implementation.
Compared to the option 1., the option 4. requires much less infrastructure to be in-place. For 1., the system environment requires:
-
a real existing email account with an IMAP access
-
the correct SMTP server configuration in the CUBA Email subsystem
-
a way to programmatically interact with an IMAP inbox in the test case
-
an active internet connection
-
a mechanism to wait & retry if the email get to inbox programmatically in the test case
Furthermore, if you think about it, all of those points actually would test the correct behavior of the CUBA Email functionality. As this is already tested within the framework itself, there is no point in verifying that. Given that you rely on the correct behavior of the CUBA Email functionality (which you do, since you use it in the Petclinic production code), we should try to exclude it from our testing efforts.
| Try to avoid double-test functionality provided by the framework in integration tests. The reason is that it is already trusted & tested by the framework itself. |
Coming back to the test case at hand: Option 4. looks most promising as it is a State verification that basically describes the contract the Petclinic application has with the EmailerAPI.
Different Test Cases
Next we will go through the different concrete test cases for the DiseaseWarningMailingService.
The following test cases can be identified:
-
warnAboutDisease_createsAnEmail_forEachEffectedPetchecks that the amount of emails passed to the
EmailerAPIis correct (happy path) -
warnAboutDisease_createsNoEmails_forACityWithoutOwnersverifies a negative code path, if there are no Owners located in a particular City to notify
-
warnAboutDisease_createsAnEmail_withTheRightEmailInformationchecks that the details of the email to be sent out matches the Owners information
-
warnAboutDisease_createsNoEmail_whenTheOwnerDoesNotHaveAnEmailAddresschecks that Pets with Owners that have not provided email addresses are filtered out before sending emails
Let’s look at the first test case which identifies that the right amount of Emails are sent out:
public class DiseaseWarningMailingServiceTest {
    // ...
    @Test
    public void warnAboutDisease_createsAnEmail_forEachEffectedPet() {
        // given: there is only one electric pet from Alabastia
        assertThat(electricPetsFromAlabastia)
            .hasSize(1); (1)
        // when: a warning is send out for Alabastia
        int effectedPets = warnAboutElectricalOverchargingIn(ALABASTIA);  (2)
        // then: the amount of effected Pets match the expected amount of one
        assertThat(effectedPets)
            .isEqualTo(1);
        // and: there is one outgoing Email for CUBAs Email Sending Functionality
        assertThat(db.outgoingEmails())
            .hasSize(1);  (3)
    }
    // ...
}| 1 | another guard assertion to check that there is one matching Pet for Alabastia |
| 2 | execution of the SUT for Alabastia |
| 3 | the amount of outgoing emails in the DB is one |
The second test case is the direct opposite of the first one. For a city which does not contain any pets, no emails should be sent out:
public class DiseaseWarningMailingServiceTest {
    // ...
    @Test
    public void warnAboutDisease_createsNoEmails_forACityWithoutOwners() {

        // given: there is no owner in the Cerulean City
        assertThat(db.ownersFromCity("Cerulean City")) (1)
            .isEmpty();
        // when: a warning is send out for Cerulean City
        int effectedPets = warnAboutElectricalOverchargingIn("Cerulean City");
        // then: no Pet should be effected
        assertThat(effectedPets)
            .isEqualTo(0);
        // and: no outgoing Email should be stored in the DB
        assertThat(db.outgoingEmails())
            .hasSize(0);
    }
    // ...
}| 1 | guard verification to check for Cerulean City no Pets are in the DB |
The last test case that is discussed here is the test case warnAboutDisease_createsNoEmail_whenTheOwnerDoesNotHaveAnEmailAddress, as it is different to the remaining test cases. This test case leverages a feature of Nested Tests. It allows you to group certain test cases within a test class and gives them a shared context. In this case it is used to create and cleanup certain test data (additional Owner and Pet) that matches the search criteria of Alabastia around each test case within this nested class.
public class DiseaseWarningMailingServiceTest {
    // ...
  @Nested
  class WarnAboutDiseaseWithAdditionalElectricPetAndOwner { (1)

        private Owner falkner; (2)
        private Pet zapdos;

        @BeforeEach
        void createAdditionalElectricPetAndOwner() {
            // given: there is a second owner in Alabastia with an electric pet without an Email Address
            falkner = db.createOwner("Falkner", null, "Miastreet 234", ALABASTIA);
            zapdos = db.createPet("123", "Zapdos", electricType, falkner);
        }

        @Test
        public void warnAboutDisease_createsNoEmail_whenTheOwnerDoesNotHaveAnEmailAddress() {

        // given: there is two pets with type 'electric' from Alabastia
        List<Pet> electricPetsFromAlabastia =
            db.petsWithTypeFromCity(electricType, ALABASTIA);
        assertThat(electricPetsFromAlabastia)
            .hasSize(2);
        // when: a warning is send out for Alabastia
        int effectedPets = warnAboutElectricalOverchargingIn(ALABASTIA);
        // then: only one email was send out for the pet with an owner that has an email
        assertThat(effectedPets)
              .isEqualTo(1);
        assertThat(db.outgoingEmails())
              .hasSize(1);
        }

        @AfterEach
        void removeAdditionalElectricPetAndOwner() { (3)
            db.removeEntity(zapdos);
            db.removeEntity(falkner);
        }
    }
    // ...
}| 1 | this nested test class focuses on the disease mailing with additional test data |
| 2 | falkner and zapdos is Fresh Fixture test data that is only available in the inner @Nested class |
| 3 | cleanup of the fixture is executed after each test case within the @Nested class |
The remaining test cases of this functionality can be found in the corresponding test class DiseaseWarningMailingServiceTest.java
Summary
This guide covers a lot of introductions and concepts. To summarize, let’s recap the main points here.
This guide started out with a general overview on test automation. We briefly mentioned benefits of test automation and described the general setup of an automated test in the Java ecosystem. Afterwards, we introduced different test environment categories: unit test and integration test. You also learned about some CUBA specifics like the CUBA middleware testing, how the Database connection is established in the tests, and the concept of the Test Container.
Then the guide focused on two examples within the Petclinic example application.
In the automatic creation of a Visit for a given Pet Identification Number we showed the test class setup. It also contains the explanation of the Test Utility Methods and how they are expressed in the test cases of this guide. By showing a concrete test case we explained the Arrange-Act-Assert pattern on how the test cases are laid out. The example also contained a explanation of test / seed data setup and the benefits and drawbacks of the shared fixture test data that is used in the guide.
The automatic "Disease Warning Mailing" for endangered Pets showed another example that introduced the problem of testing dependencies in the form of the EmailerAPI used in the implementation. We discussed different approaches and categorized them into State Verification and Behavior Verification. We’ve chosen a state verification variant in the example test case to check that the email functionality is behaving as expected.