I am following the video on how to Deploy CUBA application to Amazon Elastic Beanstalk but the video is referring to pre 7.2 release. It needs to be updated.
Seeing that build 7.2 no longer user jetty-env.xml,
How do I include my environmental variables such as RDS_HOSTNAME, etc in task buildUberJar ?
I am trying the following code but it seems incorrect:
Hi,
The first option is use backward-compatibility and use jetty-env.
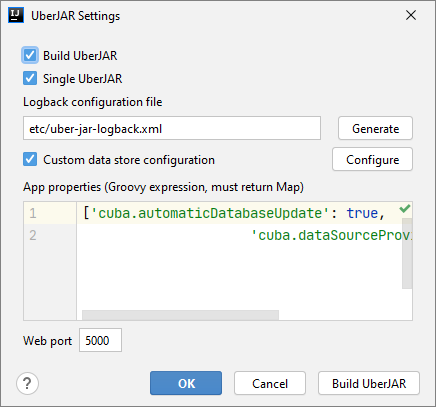
The file is still there, you just need to use jndi as a datasource provider. Please note JNDI label on the top of this dialog:
After that you can set up uberJar generation, check “Custom data store configuration” in the dialog and datasource configuration will be created for you in the file modules/core/web/META-INF/jetty-env.xml:
Another option (and it is a bit more elegant) is to use spring runtime profiles, I need some time to prepare it, will post the solution a bit later.
As I mentioned before, for the 7.2 version, I’d recommend using runtime profiles. To implement this, you need to use application-defined datasource and a separate file for the AWS deploy profile. I’ll call it amazon here. So, create a file amazon-app.properties in the core module and define datasource connection there using environment variables:
Now you need to pass the profile name when the uberJar is started in AWS. To do this, you need to specify a Procfile that allows you to customize application start command. It is described in the AWS documentation.
For the sample application, the Procfile will look like this:
To deploy everything to AWS, you need to pack the Procfile and uberJar to one archive, the Procfile should be in the root of this archive. To do this, you can add a simple gradle task to the application’s build.gradle:
task buildAwsSource(type: Zip, dependsOn: ['buildUberJar']) {
    archiveFileName = "${modulePrefix}.zip"
    destinationDirectory = file("${buildDir}/distributions/aws")
    from ("aws")
    from ("${buildDir}/distributions/uberJar")
}
Now you can run the task buildAwsSource and then deploy the resulting archive to AWS instead of Jar file. The steps that you should do in the AWS console are the same.
I’ve created a small PoC based on the sample-session-planner application, it works for me, so you can try it as an inspiration.
Hi Andrey, I read your post and followed your advice. It helped me as well, but I still have a problem. I deployed to Elastic Beanstalk successfully (last event: “Successfully launched environment”) and the health indicator is green (Ok) but when I start to access the application using the URL at the top, I get an error: 502 - Bad Gateway. Do you have any suggestion for me to help me? Thank you,
Luis
Hi Andrey,
Thanks for your reply! I also deployed your sample application and it worked. But I still cannot make my application to work. Later today I will compare both apps to try to find what I am doing wrong. I will let you know what I find. In the mean time here is a little more information.
The application seems to start well. I gathered the last 100 lines of the log files. In the stdout.log it says that the application started correctly, I did not see any error or exception.
/var/log/web.stdout.log
SslContextFactory@201a4587[provider=null,keyStore=file:///var/app/current/keystore.jks,trustStore=file:///var/app/current/keystore.jks]
Apr 18 23:09:40 ip-172-31-90-213 web: 23:09:40.400 INFO o.e.jetty.server.AbstractConnector - Started ServerConnector@942a29c{SSL, (ssl, http/1.1)}{0.0.0.0:8443}
Apr 18 23:09:40 ip-172-31-90-213 web: 23:09:40.401 INFO org.eclipse.jetty.server.Server - Started @23247ms
in the nginx error log there are a lot of messages like this:
/var/log/nginx/error.log
2021/04/19 02:41:48 [error] 4237#0: *60 connect() failed (111: Connection refused) while connecting to upstream, client: 45.144.225.96, server: , request: “GET / HTTP/1.1”, upstream: “http://127.0.0.1:8080/”, host: "34.203.23.31
Then it is an nginx config error. Just make sure that you have proper port mapping - AWS expects your application on port 5000, not 8080. Or explicitly deploy nginx.conf with proper upstream configured.